Bootstrap Textarea Group
Intro
Inside the webpages we develop we employ the form components to gather several details from the site visitors and return it back to the web site owner fulfilling several purposes. To perform it properly-- suggesting getting the right responses, the correct questions needs to be asked so we architect out forms form cautiously, thinking about all the conceivable situations and types of relevant information really needed and actually supplied.
But it doesn't matter just how correct we have this, certainly there always are some scenarios when the relevant information we desire from the site visitor is quite blurry right before it gets actually presented and requires to extend over a whole lot more than just the normal a single or else a handful of words typically written in the input fields. That is definitely where the # element comes in-- it is really the only and irreplaceable element through which the visitors can easily write back certain terms providing a reviews, sharing a purpose for their actions or just a few ideas to ideally help us making the product or service the page is about even much better.
Exactly how to work with the Bootstrap textarea:
Within newest edition of some of the most popular responsive framework-- Bootstrap 4 the Bootstrap Textarea Value element is completely sustained automatically adapting to the width of the screen page gets presented on.
Making it is quite simple - everything you need is a parent wrapper <div> feature carrying the .form-group class utilized. Inside it we should install a label for the <textarea> element carrying the for = “ - the textarea ID - " and appropriate caption to make it convenient for the user to understand what type of relevant information you would certainly need to have written in.
Next we ought to set up the <textarea> element in itself-- appoint it the .form-control class and also an appropriate ID. Do note the ID you have assigned into the for = "" attribute in the event that the past <label> should match the one to the <textarea> element. You should really additionally incorporate a rows=" ~ number ~ " attribute in order to set the lines the <textarea> will originally spread when it gets presented when the web page primarily loads-- 3 to 5 is a good value for this one considering that if the text message becomes excessive the individual is able to always resize this control via pulling or just employ the internal scrollbar popping up once message gets excessive.
Considering that this is actually a responsive component by default it spreads the entire size of its parent element.
More ideas
On the other side of coin-- there are really some cases you would intend to control the reviews provided inside a <textbox> to a certain length in characters-- assuming that this is your scenario you should as well incorporate a maxlenght = " ~ some number here ~ " attribute setting up the characters limit you require-- do keep in mind cautiously despite the fact if the limit you set will suffice for the info you need to be written properly and detailed enough-- don't forget just how disappointed you were when you were simply asked anything and in the middle of the answer were incapable to compose further-- this is actually vital given that it it achievable reaching the limit might possibly irritate the site visitors and push them from sending the form and even directly from the webpage in itself.
For examples
Bootstrap's form controls expand on Rebooted form styles with classes. Operate these classes to opt within their customised displays for a more regular rendering across gadgets and web browsers . The example form listed below demonstrates typical HTML form elements which get upgraded looks from Bootstrap with extra classes.
Just remember, due to the fact that Bootstrap utilizes the HTML5 doctype, all inputs must have a type attribute.
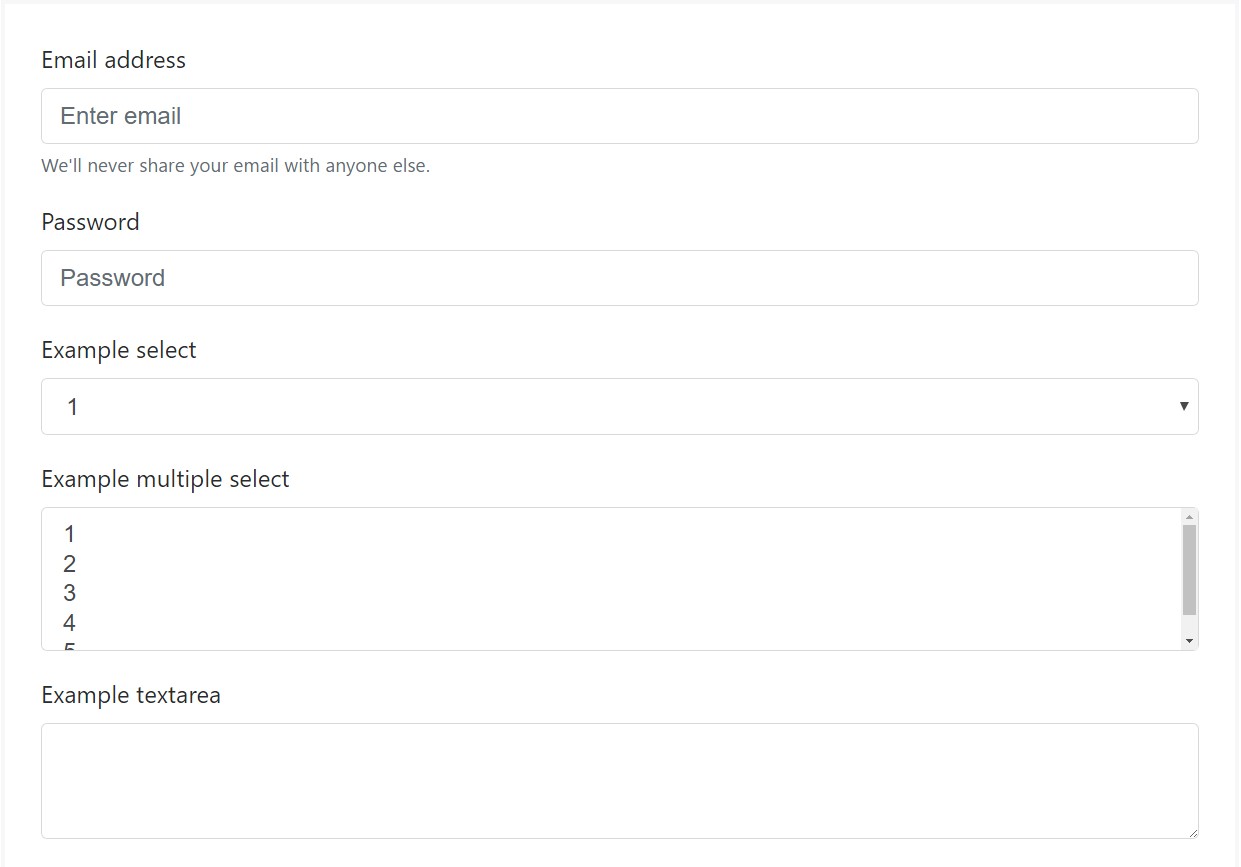
<form>
<div class="form-group">
<label for="exampleInputEmail1">Email address</label>
<input type="email" class="form-control" id="exampleInputEmail1" aria-describedby="emailHelp" placeholder="Enter email">
<small id="emailHelp" class="form-text text-muted">We'll never share your email with anyone else.</small>
</div>
<div class="form-group">
<label for="exampleInputPassword1">Password</label>
<input type="password" class="form-control" id="exampleInputPassword1" placeholder="Password">
</div>
<div class="form-group">
<label for="exampleSelect1">Example select</label>
<select class="form-control" id="exampleSelect1">
<option>1</option>
<option>2</option>
<option>3</option>
<option>4</option>
<option>5</option>
</select>
</div>
<div class="form-group">
<label for="exampleSelect2">Example multiple select</label>
<select multiple class="form-control" id="exampleSelect2">
<option>1</option>
<option>2</option>
<option>3</option>
<option>4</option>
<option>5</option>
</select>
</div>
<div class="form-group">
<label for="exampleTextarea">Example textarea</label>
<textarea class="form-control" id="exampleTextarea" rows="3"></textarea>
</div>
<div class="form-group">
<label for="exampleInputFile">File input</label>
<input type="file" class="form-control-file" id="exampleInputFile" aria-describedby="fileHelp">
<small id="fileHelp" class="form-text text-muted">This is some placeholder block-level help text for the above input. It's a bit lighter and easily wraps to a new line.</small>
</div>
<fieldset class="form-group">
<legend>Radio buttons</legend>
<div class="form-check">
<label class="form-check-label">
<input type="radio" class="form-check-input" name="optionsRadios" id="optionsRadios1" value="option1" checked>
Option one is this and that—be sure to include why it's great
</label>
</div>
<div class="form-check">
<label class="form-check-label">
<input type="radio" class="form-check-input" name="optionsRadios" id="optionsRadios2" value="option2">
Option two can be something else and selecting it will deselect option one
</label>
</div>
<div class="form-check disabled">
<label class="form-check-label">
<input type="radio" class="form-check-input" name="optionsRadios" id="optionsRadios3" value="option3" disabled>
Option three is disabled
</label>
</div>
</fieldset>
<div class="form-check">
<label class="form-check-label">
<input type="checkbox" class="form-check-input">
Check me out
</label>
</div>
<button type="submit" class="btn btn-primary">Submit</button>
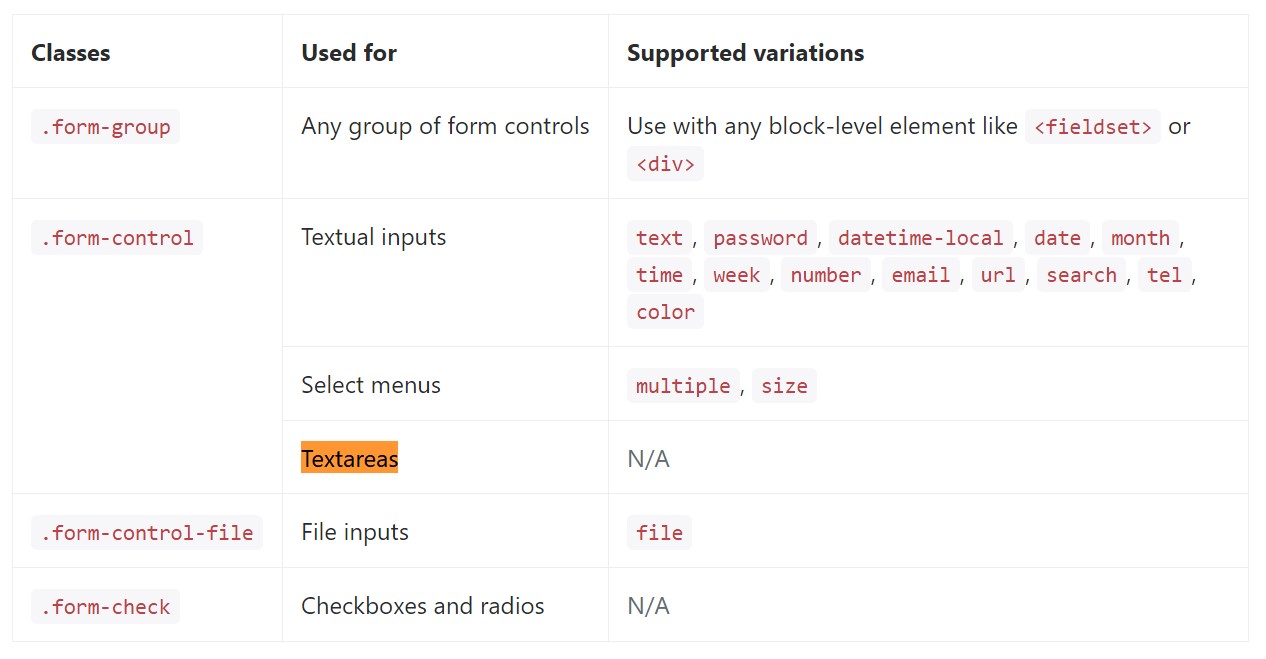
</form>Below is generally a full list of the certain form regulations maintained by Bootstrap plus the classes that customise them. Additional documentation is easily available for each and every group.
Conclusions
So now you know exactly how to create a <textarea> component inside your Bootstrap 4 powered web pages-- currently all you need to find out are the suitable questions to ask.
Check out several video information regarding Bootstrap Textarea Input:
Linked topics:
Essentials of the textarea
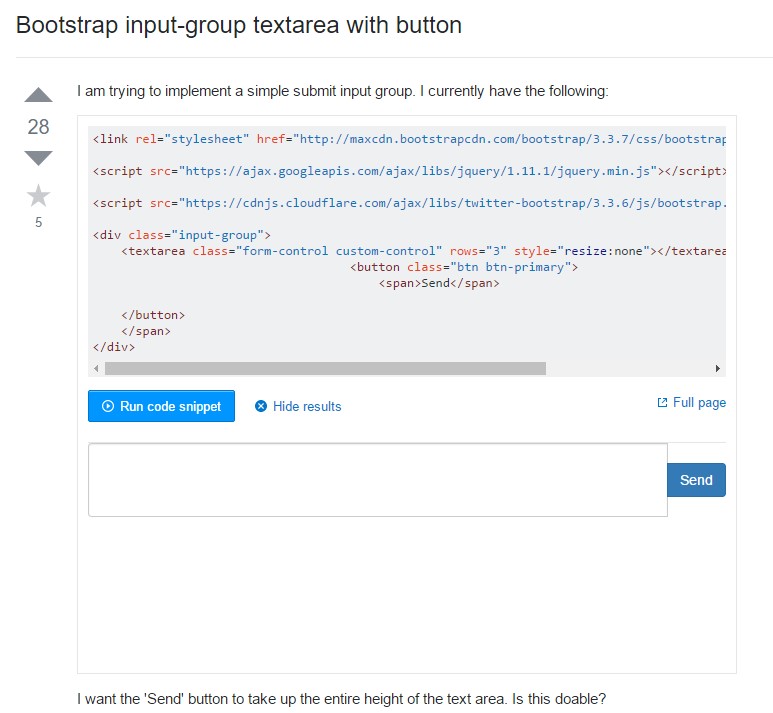
Bootstrap input-group Textarea button along with
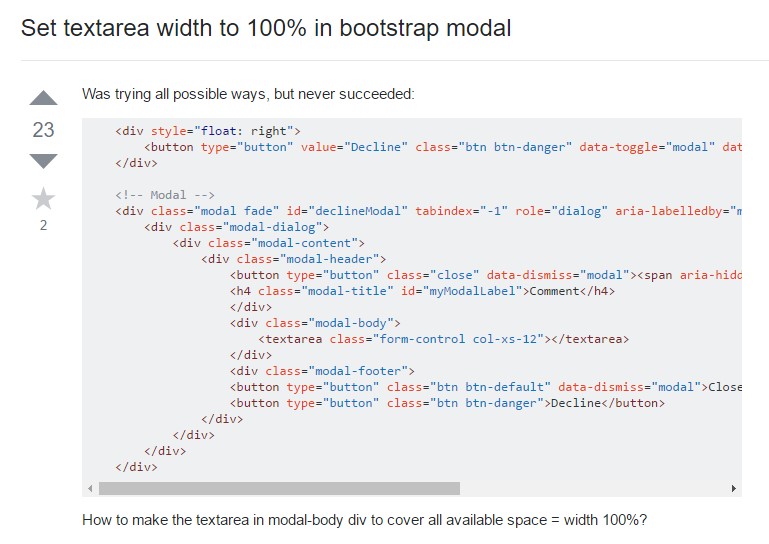
Establish Textarea width to 100% in Bootstrap modal